VMware Cloud Foundation 9 (VCF9) marks a significant advancement in private cloud infrastructure, specifically designed to simplify the deployment and scaling of trusted private clouds. VCF9 empowers organizations to operate private clouds with the efficiency and scale comparable to leading public cloud services.
The Growing Importance of Private Clouds
There’s an increasing emphasis on private clouds, driven by cost considerations associated with running applications across multiple public cloud services. Private clouds offer enhanced control, governance, and compliance, including sovereign cloud capabilities vital for jurisdictional control and regulatory adherence. VMware collaborates with major hyperscalers and a vast network of cloud service providers (CSPs), including numerous certified sovereign cloud providers, to assist organizations in meeting stringent regulatory frameworks.
Key Innovations in VCF9
VCF9 introduces several pivotal innovations:
GPU as a Service: This capability enables providers to offer sovereign AI services, facilitating the seamless migration of GPU workloads and simplifying the execution of demanding applications like PyTorch inferencing.
Memory Tiering (vSphere): This innovation is projected to increase virtual machine density by approximately 40%, leading to substantial cost savings.
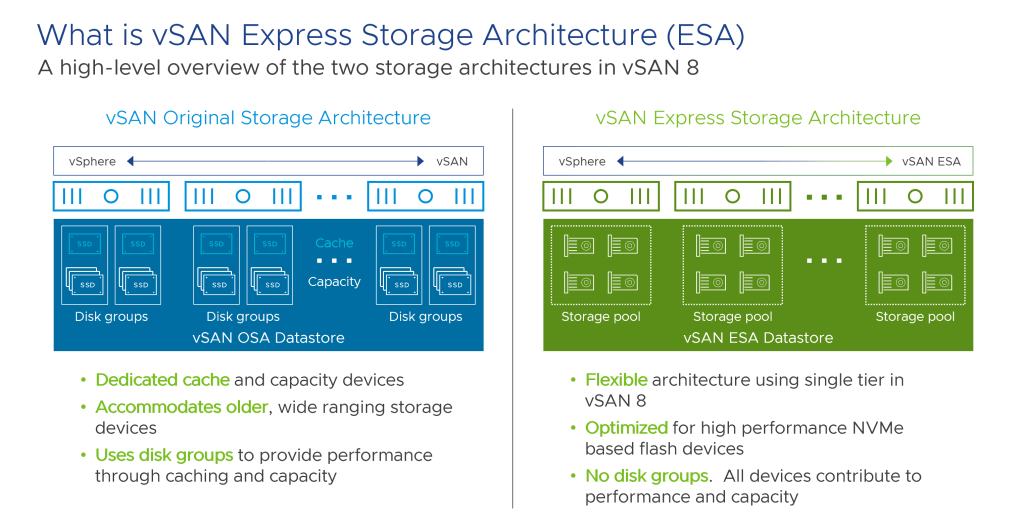
VSAN with Enhanced Storage Architecture (ESA): Re-architected with NVMe drives, VSAN delivers predictable latencies under one millisecond, improved resilience through distributed failover, and reduced costs compared to traditional storage arrays.
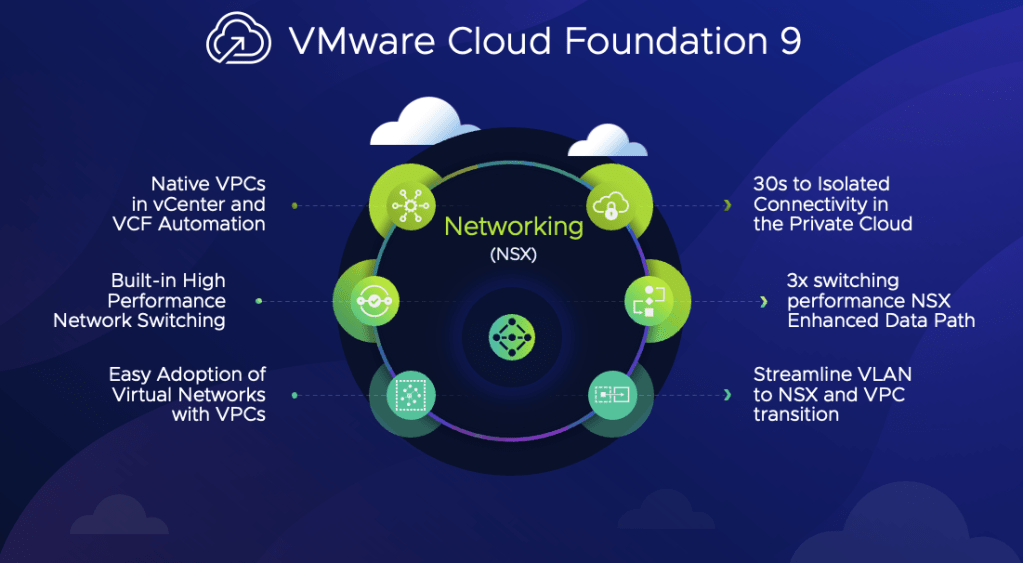
Native Virtual Private Clouds (VPCs): VCF9 natively integrates VPCs, allowing users to define virtual boundaries for applications and manage network settings such as firewalls and load balancing directly within the vCenter console.
Native Kubernetes and Container Services: Treating both virtual machines and containers as native elements, VCF9 includes out-of-the-box management for essential Kubernetes services, streamlining the deployment and orchestration of containerized applications.
VCF9 represents a significant evolution, establishing itself not only as a robust platform for virtual machines but also as a leading solution for running and orchestrating containers with Kubernetes. It is engineered to support emerging use cases like AI workloads and to address contemporary security challenges, including ransomware.
Broadcom has launched Usage Meter 9.0 and a new management portal. These updates will change how you handle usage reporting and billing.
Here’s a simple guide to what’s new and what you need to do.
Of course. Here is a more reader-friendly version of the blog post.
Big News for VMware Providers: Your Guide to Usage Meter 9.0
Big changes are here for VMware Cloud Service Providers. Broadcom is launching Usage Meter 9.0 and a new management portal. These updates will change how you handle usage reporting and billing.
Here’s a simple guide to what’s new and what you need to do.
Key Changes You Can’t Ignore
1. Metering is Now Online-Only
The biggest change? All usage metering must now be done online. The option for offline reporting is gone. Your Usage Meter tool will now collect and send all data directly to the cloud.
2. How Your Billing Will Work
The billing process is also getting an overhaul.
The Usage Meter will create hourly reports that determine your bill.
Important: You must use official Broadcom-generated VCF license keys. Usage from any other keys will not be tracked or billed.
3. A New Home for Management
Say goodbye to the old portal.
Old Portal:console.cloud.vmware.com
New Portal:vcf.broadcom.com
This new Business Services Console is your new hub for managing Usage Meter registrations, reports, and licenses.
What’s New in Usage Meter 9.0?
The latest version comes with two key upgrades:
Expanded Support: It now supports on-demand metering for NSX vFend, giving you more detailed usage data.
Tighter Security: A new OAUTH token is now required for authentication. You will need to set this up manually during the upgrade.
Your Simple To-Do List
To stay compliant and keep things running smoothly, here are your next steps:
✅ Swap Your License Keys: Switch to official Broadcom VCF keys as soon as possible.
✅ Stay Updated: Watch for the official launch announcements for the new portal and Usage Meter 9.0.
✅ Upgrade Within 90 Days: Once it’s released, you have 90 days to upgrade all your Usage Meter instances.
✅ Generate Your OAUTH Key: Don’t forget this manual step during the upgrade process.
✅ Note the License Cap: Be aware that a cap on license keys took effect on May 12th.
By following these steps, you can ensure a smooth transition. These updates are a major step forward, and staying prepared is key to success.
In today’s demanding IT landscape, businesses are constantly seeking ways to optimize resources and reduce operational expenses. VMware Cloud Foundation (VCF) emerges as a powerful solution, offering a multitude of ways to lower your Total Cost of Ownership (TCO). This platform streamlines operations, enhances resource utilization, and provides a unified approach to managing both traditional and modern applications. Let’s delve into five key ways VCF can contribute to significant cost savings for your organization.
1. Enhanced Resource Utilization for Maximum Efficiency
One of the primary benefits of VCF lies in its ability to maximize your existing hardware. By optimizing memory usage, VCF allows you to run a greater number of workloads on fewer physical machines. This directly translates to reduced capital expenditure on new servers. Furthermore, VCF incorporates automated power management features. It intelligently adjusts host power based on real-time demand, leading to a noticeable reduction in energy consumption and associated costs.
2. Revolutionizing Storage with Hyperconvergence
Say goodbye to expensive, proprietary storage solutions. VCF leverages hyperconverged storage, enabling you to run enterprise-grade storage capabilities on standard x86 servers. This approach can dramatically cut down on hardware costs, with potential savings of up to 30% on total storage expenses over a five-year period.
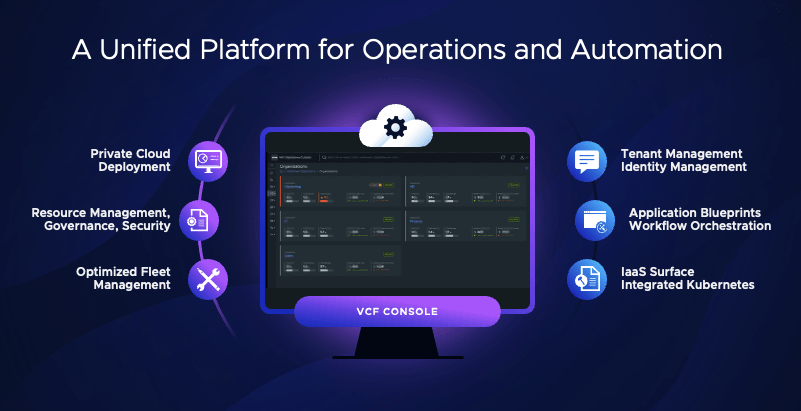
3. A Unified Platform for Seamless Application Management
The complexity of managing diverse application portfolios can be a significant drain on resources. VCF addresses this challenge by providing a single, unified platform for operating both traditional and modern applications. This streamlined approach not only simplifies IT operations but also boosts developer productivity by offering a consistent environment.
4. Embracing the Efficiency of Infrastructure as a Service (IaaS)
VCF delivers a modern Infrastructure as a Service (IaaS) experience. Through a self-service catalog and policy-based automation, it simplifies the provisioning of resources. This empowers teams to access the infrastructure they need quickly and efficiently, reducing manual workloads and freeing up IT staff to focus on more strategic initiatives.
5. Agile and Flexible Networking through Virtualization
Traditional networking can often create bottlenecks and hinder agility. VCF overcomes these limitations by virtualizing the network, which facilitates workload mobility and adaptability. Moreover, it supports virtual private cloud (VPC)-driven networking. This innovative feature allows development teams to consume network services on demand, fostering a more agile and responsive IT environment.
By implementing VMware Cloud Foundation, organizations can achieve substantial reductions in their Total Cost of Ownership through improved resource utilization, cost-effective storage solutions, unified application management, efficient IaaS capabilities, and flexible virtualized networking.
Migrating workloads into VMware Cloud Foundation (VCF) can be a streamlined process thanks to HCX, a powerful tool included with VCF. Whether you’re working with older vSphere environments, Hyper-V, or KVM, HCX offers a versatile approach to workload migration. This technology proves invaluable for tasks such as rebalancing workloads across your data centres and navigating the complexities of hybrid cloud deployments. A compelling example of its capability was witnessed in 2022, where HCX played a crucial role in migrating workloads out of Ukraine. Ultimately, HCX empowers organizations to achieve data centre consolidation, modernize their infrastructure, and ensure workload portability across various cloud providers.
Key Capabilities for Effortless Migration:
Non-Disruptive Migration: HCX provides a suite of migration options, including cold migration, bulk migration, vMotion, and HCX-assisted vMotion, all designed to minimize any interruption to your operations.
Efficient Organization with Mobility Groups: Streamline your migration projects by organizing virtual machines into logical mobility groups.
Optimized Transfers over Distance: Built-in WAN optimization features ensure efficient migration even when dealing with slower network links.
Maintaining Network Continuity: Layer 2 network extension allows you to preserve network connectivity for your workloads during the migration process.
Illustrative Migration Scenario: From Sofia to London
Consider a scenario where a virtual machine needs to be moved from a location in Sofia to London. By leveraging layer 2 network extension, continuous connectivity can be maintained throughout this transition. The process involves a straightforward selection of the virtual machine, designation of the target cluster and datastore, and configuration of the desired migration settings. Employing technologies like replicated vMotion enables near-zero downtime migration. By continuously monitoring network pings between the source and destination, the minimal impact and seamless nature of the migration become evident.
Understanding the HCX Architecture
The HCX service mesh comprises key components playing a vital role in the migration process. It’s important to distinguish between the HCX Connector and the HCX Cloud Manager to fully grasp the architecture. Furthermore, understanding network extension topology and the available high availability options contributes to a robust deployment. HCX offers various migration methodologies, including standard vMotion, HCX-assisted vMotion, bulk migration, and OS-assisted migration, catering to different requirements. Features like seed checkpoint provide resilience against migration failures, while mobility-optimized networking ensures efficient traffic flow for migrated workloads.
Further Exploration
For those interested in delving deeper into the capabilities of HCX, additional resources and hands-on labs are readily available. Exploring these materials can provide a more comprehensive understanding of how to effectively leverage HCX for your workload migration needs.
Navigate to the Broadcom Support Portal: Go to the official Broadcom support website.
Create an Account (if you don’t have one): You’ll likely need to register for a free account to access the downloads section.
Locate the VMware vSphere Hypervisor 8 Download: Once logged in, navigate to the downloads area and search for “VMware vSphere Hypervisor” or “ESXi”. Look for version 8.
Download the ISO Image: You should find an ISO file that you can download. This file is used to install the hypervisor on your server.
Follow the Installation Instructions: Broadcom provides comprehensive documentation to guide you through the installation process.
VMware’s vSAN offers powerful snapshot capabilities that can significantly bolster your data protection strategy. Recent advancements in vSAN Express Storage Architecture (ESA) and the introduction of vSAN Data Protection provide a robust set of tools for efficient snapshot management.
Leveraging vSAN ESA for Performance
vSAN ESA is designed to take full advantage of modern hardware, including high-performance CPUs, networking, and NVMe drives. A key innovation is the redesigned snapshot engine, which delivers improved performance and reduced latency, ensuring minimal impact on production workloads.
Fine-Grained Control with Storage Policy-Based Management (SPBM)
vSAN ESA utilizes SPBM, allowing for granular control over storage resources. By defining policies, you can configure critical parameters such as disaster tolerance, failures to tolerate, and performance settings, aligning storage with specific application requirements.
vSAN Data Protection: A Centralized Management Hub
The introduction of vSAN Data Protection provides a centralized platform for managing vSAN snapshots. Key functionalities include revert, clone, and restore operations. Notably, introducing immutable snapshots provides an additional layer of protection against data manipulation and ransomware attacks.
Ensuring Data Consistency with Protection Groups
Protection Groups enable consistent snapshot management by grouping virtual machines into logical units. This simplifies administration and guarantees that related VMs are captured simultaneously. Dynamic membership based on naming conventions further streamlines management.
vSAN Snapshots: A Foundation for VMware Live Recovery
vSAN snapshots are integral to VMware Live Recovery, facilitating offsite replication for disaster recovery and cyber recovery scenarios. This ensures business continuity in the event of outages or attacks.
Practical Applications of vSAN Snapshots
vSAN snapshots offer a range of practical applications:
Point-in-time recovery: Quickly revert to a previous state to recover from data corruption or application errors.
VM recovery: Retrieve accidentally deleted virtual machines.
Development and testing: Rapidly provision clones of production environments for development and testing purposes.
vSAN Data Protection vs. vSphere Replication
While vSAN Data Protection and vSphere Replication offer data protection, they serve distinct purposes. vSAN Data Protection focuses on snapshots within the vSAN environment, while vSphere Replication is storage-agnostic and can replicate data to diverse storage systems.
The Future of vSAN Data Protection
The evolution of vSAN data protection continues, with future advancements promising even greater efficiency and resilience. Anticipated features include enhanced replication capabilities between vSAN environments, with exceptionally low Recovery Point Objectives (RPOs).
Modernizing your infrastructure and gaining the benefits of a full-stack, software-defined data center (SDDC) is a key goal for many organizations. Converting your existing vSphere environment to VMware Cloud Foundation (VCF) allows you to achieve this, automating the deployment and lifecycle management of your infrastructure. This post will guide you through the process, providing the necessary technical insights and resources.
Understanding the Conversion Process
The conversion, often referred to as a “brownfield” deployment, transforms your existing vSphere environment into a VCF-managed SDDC. This process leverages the brownfield.py script and the SDDC Manager to automate the transition.
Prerequisites
Before initiating the conversion, ensure your environment meets the following prerequisites:
vCenter Server:
Version: 8.0 U3c or later.
Ensure the vCenter Server Appliance (vCSA) is healthy and functioning correctly.
ESXi Hosts:
Version: 8.0 U3c or later.
Verify hardware compatibility with the target VCF version using the VMware Compatibility Guide.
All hosts must be on the Hardware Compatibility List (HCL) for the target VCF version.
Networking:
Proper DNS configuration with forward and reverse lookup zones.
NTP server synchronization.
Sufficient IP address ranges for management, workload, and NSX-T components.
VLANs available for management, workload, and NSX-T overlay networks.
MTU consistency across the network.
Storage:
vSAN health check (if applicable).
VMFS compatibility.
Storage policies should be understood before conversion.
Licensing:
Valid vSphere and NSX licenses.
Software Downloads:
SDDC Manager OVA: Download the latest SDDC Manager OVA from the VMware Customer Connect portal.
Monitor the conversion process closely. This process automates the deployment of the new NSX-T environment.
Be prepared to provide input as the process continues.
Post-Conversion Tasks:
Verify the successful completion of the conversion in the SDDC Manager interface.
Verify the health of the NSX-T environment.
Validate vCenter Server integration.
Create workload domains as needed.
Apply any needed patches, and updates.
Test all critical workloads.
Key Technical Considerations
Network Segmentation: Proper network segmentation is crucial for NSX-T and VCF.
DNS and NTP: Ensure reliable DNS and NTP services.
MTU: Maintain consistent MTU sizes across the network.
Logging: Regularly review logs for troubleshooting.
API Interactions: Understand how the SDDC Manager uses APIs to interact with vSphere and NSX-T.
Troubleshooting
Analyze SDDC Manager, NSX-T, and ESXi logs.
Use API debugging tools.
Consult the VMware knowledge base.
Engage VMware support if necessary.
Converting your vSphere environment to VCF offers significant benefits, including automation, simplified management, and improved scalability. By carefully following these steps and addressing the prerequisites, you can successfully transform your data center.
VMware Cloud Foundation (VCF) 9, unveiled at VMware Explore 2024 in Las Vegas, promises to be a game-changer for private cloud infrastructure. With a focus on simplifying deployment, enhancing security, and unifying management, VCF 9 is set to streamline the transition from siloed IT environments to an integrated cloud platform. As businesses gear up for its release—potentially around May 2025—now is the time to prepare. Whether you’re upgrading from an earlier VCF version or starting fresh, this guide outlines actionable steps and best practices to ensure a smooth adoption of VCF 9.
Why Prepare for VCF 9?
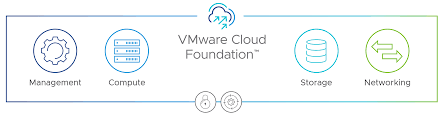
VCF 9 builds on the strengths of its predecessors, integrating compute (vSphere), storage (vSAN), networking (NSX), and advanced management capabilities into a cohesive stack. It introduces platform-wide innovations like simplified installation, enhanced multi-tenancy, and centralized fleet management—features designed to boost efficiency and scalability. Preparing now ensures you can leverage these advancements without last-minute scrambles, minimizing downtime and maximizing value.
Step-by-Step Preparation Guide
1. Assess Your Current Environment
Before diving into VCF 9, take stock of your existing infrastructure:
Inventory Your Setup: Document your current VMware components (vSphere, vSAN, NSX, etc.), versions, and hardware. Tools like the PowerCLI script for counting cores and TiBs (available from Broadcom’s knowledge base) can help quantify your licensing needs.
Check Compatibility: Review your hardware against VMware’s Hardware Compatibility List (HCL) for VCF. VCF 9 will likely demand modern hardware for features like vSAN Express Storage Architecture (ESA).
Evaluate Workloads: Identify workloads you’ll migrate or deploy. Are they compute-heavy, storage-intensive, or network-dependent? This informs your VCF 9 design.
Best Practice: Don’t assume your current setup is ready—validate everything. Misaligned hardware or outdated firmware can derail deployment.
2. Upskill Your Team
VCF 9’s new features—like a simplified installer and unified operations—require familiarity:
Training: Enroll your IT team in VMware-authorized courses (e.g., VMware Cloud Foundation: Planning, Management, and Operations). Hands-on labs can simulate VCF workflows.
Documentation: Study existing VCF docs (e.g., the Operations Guide on docs.vmware.com) and monitor VMware’s blog for VCF 9-specific updates post-release.
Certifications: Aim for VMware Certified Professional (VCP) credentials in Data Center Virtualization to build foundational expertise.
Best Practice: Pair theoretical learning with practical experience. Set up a lab using nested ESXi hosts to mimic VCF 9’s architecture once beta or trial versions emerge.
3. Plan Your Deployment Strategy
VCF 9 emphasizes automation and consistency, so plan accordingly:
Greenfield vs. Brownfield: Decide if you’re starting anew (greenfield) or upgrading (brownfield). Brownfield upgrades need careful migration planning to minimize disruption.
Workload Domains: Define your management and VI workload domains. VCF 9’s multi-tenancy enhancements may influence how you isolate tenants or applications.
Networking: Prepare for NSX integration. Ensure your physical network (switches, VLANs) supports VCF’s requirements, especially for vMotion and vSAN traffic.
Best Practice: Stick to VMware’s validated designs. Avoid tweaking settings outside SDDC Manager’s conventions—customizations can break Day 2 operations.
4. Optimize Your Infrastructure
Get your hardware and software in top shape:
Firmware Updates: Update server BIOS, NICs, and storage controllers to the latest HCL-supported versions.
Storage Planning: If using vSAN, calculate your raw capacity needs (in TiBs) and account for VCF 9’s entitlement (1 TiB per core for VCF). Purchase additional capacity if needed.
Licensing: Verify your subscription aligns with VCF 9’s core-based model (minimum 16 cores per CPU). Use Broadcom’s license downgrade/upgrade process if bridging from older versions.
Best Practice: Design for resilience. Size clusters to handle a host in maintenance mode plus a failed host—VCF thrives on availability.
5. Test and Validate
Don’t leap blindly into production:
Lab Deployment: Deploy an earlier VCF version like 5.2 in a test environment to master the process. Adapt learnings to VCF 9 once available.
Pre-Checks: Use tools like Cloud Builder’s validation steps to catch DNS, NTP, or IP conflicts early.
Backup Strategy: Implement a robust backup solution (e.g., BDRSuite or Veeam) to protect workloads during migration.
Best Practice: Simulate failures (e.g., host outages) to ensure your design holds up. VCF 9’s reduced downtime promises won’t matter if your prep overlooks fault tolerance.
6. Leverage Automation and Operations Tools
VCF 9’s unified management is a highlight—prepare to use it:
SDDC Manager: Master its role in lifecycle management and configuration. Practice JSON-based deployments for repeatability.
Aria Suite: Integrate Aria Operations and Automation for monitoring and orchestration. VCF 9’s centralized control will rely on these tools.
Security: Harden your environment with VCF’s built-in certificate and password management features.
Best Practice: Automate wherever possible. Manual tweaks undermine VCF’s “infrastructure as code” ethos.
Key Best Practices for Success
Standardize: Embrace VCF’s conventions—resist the urge to customize outside supported parameters.
Document: Maintain detailed records of your design, IPs, and configurations. A JSON spec file is your blueprint.
Monitor Updates: VCF 9’s release may shift (rumoured for May 2025). Check VMware’s VCF Blog and Broadcom’s support portal for timelines and patches.
Engage Support: Tap VMware Professional Services or partners for complex migrations—they’ve seen the pitfalls.
What to Do Right Now?
VCF 9 isn’t out yet, but you can:
Audit your environment and update hardware/software.
Train your team on VCF fundamentals.
Build a lab to test an earlier version like 5.2, anticipating 9’s enhancements.
Draft a high-level deployment plan, refining it as VCF 9 details emerge.
Final Thought
VMware Cloud Foundation 9 is poised to redefine private cloud management with its streamlined deployment and integrated features. Preparing now—through assessment, training, and strategic planning—positions you to hit the ground running. Stay curious, question assumptions, and lean on VMware’s ecosystem to make your transition seamless. The future of your IT infrastructure starts with the steps you take today.
Deploying VMware Cloud Foundation is an automated process that leverages VMware Cloud Builder, simplifying the management domain’s setup. This domain includes all the management components like vCenter Server, NSX Manager, and vRealize Suite for operations management. Here are the key steps:
Preparation: Before deployment, prepare by gathering all necessary inputs through the VMware Cloud Foundation Planning and Preparation Workbook. This includes network configurations, hardware specifics, and licensing details.
Initial Deployment: Use VMware Cloud Builder to deploy the management domain. This involves setting up the core infrastructure components like ESXi hosts, vCenter Server, vSAN, and NSX. The process is highly automated, reducing the risk of human error.
VI Workload Domains: After setting up the management domain, deploy virtual infrastructure (VI) workload domains for customer workloads. These can be tailored to specific needs, choosing between vSAN, NFS, or other storage options.
Integration: Integrate with cloud management solutions like VMware Aria Suite (formerly vRealize Suite) for enhanced monitoring, automation, and lifecycle management.
Scaling VMware Cloud Foundation
Scaling VCF is crucial as your organization grows, and here’s how you can approach it:
Scaling Out:
Adding Hosts: Once you’ve commissioned new hosts, you can add them to existing VI workload domains or create new ones. VCF supports scaling up to 64 hosts per vSphere cluster in a VI workload domain, providing significant flexibility.
Multi-Cluster Domains: For high-performance computing or big data scenarios, you can scale by adding more clusters within a workload domain, each managed by its vCenter Server instance.
Scaling Up:
Resource Pooling: Use vSphere resource pools to manage resources more granularly, especially in smaller deployments where you might operate with a consolidated architecture model where management and user workloads share resources.
Horizontal Scaling for Multi-Site Deployments:
Multiple VCF Instances: For businesses with multiple data centres or geographical locations, deploying multiple instances of VCF can support disaster recovery, workload mobility, and geographical distribution of resources.
Automation and Lifecycle Management:
VCF’s integration with SDDC Manager automates much of the scaling process, from adding hosts to managing software updates across the stack. This ensures that scaling doesn’t just mean adding more hardware but also maintaining the software stack’s integrity and performance.
Best Practices for Scaling
Plan for Scale: Use the VMware Cloud Foundation Design Guide to plan your scale, keeping in mind future growth. Consider how the architecture (standard or consolidated) will affect your scaling strategy.
Performance Monitoring: Leverage VMware Cloud Foundation Operations (formerly VMware Aria Operations) for performance monitoring to understand when and where to scale.
Regular Updates: Keep your VCF environment updated to benefit from the latest features and performance enhancements, which can also simplify scaling.
Validate Solutions: Employ VMware Validated Solutions for guidance on scaling and performance, ensuring your infrastructure remains aligned with best practices and validated scalability.
VMware Cloud Director 10.6.1 is the latest release of VMware Cloud Director. It includes a number of new features and enhancements, as well as some known issues and workarounds.
Sure, here is a blog post based on the VMware Cloud Director 10.6.1 Release Notes:
VMware Cloud Director 10.6.1 Release Notes
VMware Cloud Director 10.6.1 is the latest release of VMware Cloud Director. It includes a number of new features and enhancements, as well as some known issues and workarounds.
New Features and Enhancements
Support for Tanzu Kubernetes clusters: VMware Cloud Director now supports the creation and management of Tanzu Kubernetes clusters. This allows you to run containerized applications on your VMware Cloud Director infrastructure.
Improved performance: VMware Cloud Director has been optimized for improved performance and scalability.
Enhanced security: VMware Cloud Director now includes a number of new security features, such as support for FIPS 140-2 compliant encryption.
Known Issues and Workarounds
Using MQTT for blocking tasks and events monitoring might cause the VMware Cloud Director UI and API to become inaccessible: This issue can be resolved by disabling MQTT monitoring.
The automatic cleanup of vApp templates does not delete all applicable templates: This issue can be resolved by manually deleting the templates.
Powered-off VMs fail to power on with an Internal Server Error: This issue can be resolved by restarting the VMware Cloud Director appliance.
The upgrade of the VMware Cloud Director appliance fails when using the Broadcom repository: This issue can be resolved by using the VMware repository.
Tenant users cannot delete a vApp template that is in an Unresolved state: This issue can be resolved by resolving the vApp template.
You cannot edit the metadata of an organization: This issue can be resolved by using the VMware Cloud Director API.
VM does not receive the DNS Server IP addresses from the DHCP scope that is defined in the vApp network: This issue can be resolved by manually configuring the DNS Server IP addresses on the VM.
Attaching a named disk to a VM fails with a java.util.concurrent.ExecutionException: This issue can be resolved by restarting the VMware Cloud Director appliance.
You might receive an unable to find valid certification path to request target – PKIX path building failed error when changing the JMX certificate of a cell using the UI: This issue can be resolved by using the VMware Cloud Director API.
Activating a cell using the cell management tool command does not update the cell status in the Service Provider Admin Portal: This issue can be resolved by restarting the VMware Cloud Director appliance.
Fast Cross vCenter vApp instantiation fails when instantiating a template that has VMs with memory: This issue can be resolved by increasing the memory allocation for the template.
If you have any subscribed catalogs in your organization, when you upgrade VMware Cloud Director, the catalog synchronization fails: This issue can be resolved by manually synchronizing the catalogs.
When you edit the catalog subscription settings, a trust on first use (TOFU) dialog box prompts you to trust the remote catalog certificate: This issue can be resolved by trusting the remote catalog certificate.
After upgrading VMware Cloud Director and enabling the Tanzu Kubernetes cluster creation, no automatically generated policy is available and you cannot create or publish a policy: This issue can be resolved by manually creating a policy.
Entering a Kubernetes cluster name with non-Latin characters deactivates the Next button in the Create New Cluster wizard: This issue can be resolved by using only Latin characters in the Kubernetes cluster name.
NFS downtime can cause VMware Cloud Director appliance cluster functionalities to malfunction: This issue can be resolved by restarting the VMware Cloud Director appliance cluster.